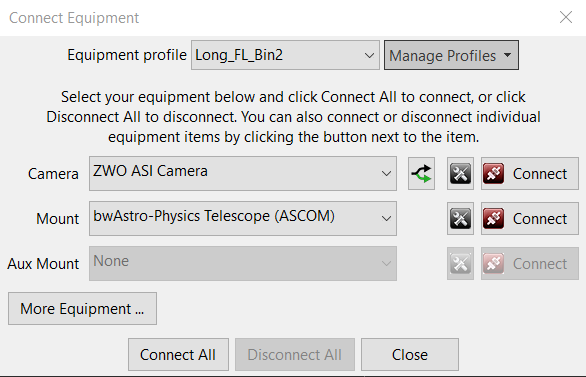
2. Camera connection pane: unbinned pixel size. If you said 'yes' to the connection prompt, this information will usually be filled in automatically and the control will be disabled. If you said 'no' or if the device doesn't report its pixel-size, you'll need to enter the value by hand. You should be able to get the unbinned pixel size from the camera spec sheet or the manufacturer's web site. If the pixels aren't square, just specify the larger dimension or the average value if you prefer. This won't have any effect on your actual guidng results, but it will allow PHD2 to know the image-scale for your set-up. This is used for setting baseline guiding parameters, doing sanity-checks on calibrations, reporting guiding performance, and getting support on our forum..
3. Camera connection pane: binning level. If your guide camera supports binning (many do not), you can specify what level of binning you want to use for this equipment profile. If you want to use the same equipment set-up with different binning levels, it's best to create separate profiles for each binning value. If your guide camera has very small pixels and you have also specified a long focal length, you may see a 'warning' icon next to the Pixel Scale field. That is telling you that the specified image scale is probably too small and you should bin the camera if possible.
4. Camera connection pane: guide scope focal length. This seems to be a common place for mistakes, so it's worth being careful and getting it right. The correct value is not the aperture of the guide scope, it is the focal length. So, for example, if you're guiding with a 50mm finder scope, the focal length willl not be 50mm - it will probably be something closer to 150-175mm. A 60-80mm refractor guide scope will probably have a focal length in the range of 240-500mm, not 60-80mm. Similarly, if you're guidng with an OAG on your main imaging scope, the focal length will be that of the main scope. In some cases, you may be using a small threaded focal reducer on the guide camera, so that must also be taken into account. Like the pixel-size entry, the focal length doesn't demand a great deal of precision, but you should get as close as you can. Otherwise, the performance numbers may not reflect your actual results and the baseline guiding parameters may be sub-optimal.
5. Mount connection pane: mount guide speed. This is another area that seems to cause confusion. The guide speed is a parameter set in the mount or in themount driver, it's not something controlled by PHD2. PHD2 never sets the mount guide speed, it only reads it. It is usually expressed as a multiple of the sidereal rate and is typically in the range of 0.5x - 1x sidereal. Despite what you may read elsewhere, it's usually best to use guide speeds in this range rather than much lower speeds. Higher guide speeds can help to clear backlash more quickly and may help to overcome stiction problems. If you say 'yes' to the connection option prompt, PHD2 will attempt to read the current guide speed from the mount. If this fails for some reason, you'll need to enter the guide speed manually. PHD2 uses this value to automatically set the calibration step-size and to aid in checking calibration results; but the guide speed information is not important for the actual guiding. If you're using different guide speeds on the RA and Dec axes, enter the larger value. If you really can't determine what the guide speed settings are in the mount, leave the setting at the default value of 0.5X. This pane also has a checkbox regarding the presence of high-precision encoders in the mount. These devices are somewhat rare but are sometimes included on expensive, high-precision mounts, and you are likely to know if you have them. Most users will leave this box unchecked.
- See Full List On Docs.microsoft.com
- Drivers Phd Port Devices 2019
- How To Connect Two Programs (TheSkyX And PHD2) To ASCOM ...
First, start the PC client. You’ll find a shortcut to DroidCam Client under Start Menu and on your Desktop.

If there is a separate admin account on the system, these shortcuts will be created on that users Desktop/Start Menu during installation.
Serial Connectivity External serial servers that provide connectivity to any serial device Terminal servers and serial servers connect critical equipment to applications, providing 1, 2, 4, 8, 16, and 32 port serial-over-Ethernet options with transparent connectivity for existing serial applications. After the drivers are installed, re-connect the device to the computer and try again to refresh the USB list on the DroidCam PC Client. On the phone you may get a dialog asking Allow USB Debugging, you need to tap OK.

Connect via WiFi
1. Turn on WiFi on your phone and connect to your home network as you normally would.
2. Start the phone app. The app will show Wifi IP & Port information.
If the IP is all zeros (0.0.0.0) – you are not properly connected to a WiFi network.
3. On the PC client, make sure the connection method is “WiFi/LAN”. Enter the IP and Port as displayed on the phone. Click [start].
4. The phone app should start showing the camera output. The PC client should start updating the “webcam” output, you can check in Skype/Zoom/etc. Find ‘video input’ settings in the options/preferences of these programs.
If the connection fails, try:
– Closing and re-opening the app
– Toggling the Wifi on phone and/or laptop
– Restarting your Wifi router (unplug from power, wait a few seconds, and plug it back in)
– Changing the connection port number in the app & client (eg. 4748 …)
Connect via USB (Android)
For USB connections, you need to: a. enable USB Debugging on the phone, b. install drivers for your phone on the computer.
1. First, make sure “USB Debugging” is enabled on your phone. Its located in the phones Settings, under Developer Options.
On most phones the Developer Options screen is hidden by default. To unlock it, open the phones Settings, go to About Phone and search for Build number. Tap Build Number seven times to unlock Developer options.
If you’re having trouble, try the instruction here: https://www.howtogeek.com/129728/how-to-access-the-developer-options-menu-and-enable-usb-debugging-on-android-4.2/
Once unlocked, search for USB Debugging and turn it On.
2. With “USB Debugging” turned on, connect your device to the computer via USB.
In the DroidCam PC client, pick the USB connection option and click the refresh button. The client will try to detect connected devices. If the client detects your phone, you’ll likely get a dialog on the phone asking Allow USB Debugging, you need to tap OK. You can also skip the next step.
3. If the device is not detected, you need to install drivers for it as an additional step.
If you have a Google Nexus/Pixel, or a OnePlus, get the Google USB drivers:
https://developer.android.com/studio/run/win-usb.
Samsung USB drivers:
https://developer.samsung.com/mobile/android-usb-driver.html
LG Mobile Drivers:
https://www.lg.com/us/support/help-library/lg-mobile-drivers-and-software-CT10000027-20150179827560.
For other brands, this page provides links to most manufacturers websites: http://developer.android.com/tools/extras/oem-usb.html#Drivers.
You can also do a web search, ADB Drivers for ____.
Eg: ADB Drivers for HTC.
After the drivers are installed, re-connect the device to the computer and try again to refresh the USB list on the DroidCam PC Client. On the phone you may get a dialog asking Allow USB Debugging, you need to tap OK.
4. Once the client detects the phone, click Start to establish a connection just like you would over WiFi.
If you get “connection reset”, “connect lost”, “error receiving video headers” errors:
(1) On the phone, make sure the DroidCam app is open and ready.
(2) On the phone, pull down the notification area and open “USB Options”. Try picking the ‘PTP’ (Picture Transfer), or ‘Camera’, or just ‘Charging’ mode.
If the connection is still failing, try
(1) If you skipped the driver installation step above, try installing the drivers for your phone manually. Sometimes Windows auto-installs incorrect ones.
(2) Try changing the ‘DroidCam Port’ setting in the app, and on the client. Use, for example, 4848, 5050, 5151, etc.
(3) Try this alternate USB setup tool. The tool will detect and setup local port forwarding against all connected devices. If it works, you can replace the adb folder under Program Files x86 > DroidCam with the one in this download.
Connect via USB (iOS)
USB connections for the iOS app require iTunes to be installed and that it detects your iDevice when you plug it in.See Full List On Docs.microsoft.com
Click the refresh button on the DroidCam Client ‘USB’ tab and any available iOS devices will be listed as a string of random characters, this is the unique ID of the device. Click Start to establish a connection just like you would over WiFi.
Notes:
– Make sure you have at least v6.2.3 of the Windows client which includes iOS support.
– The Windows Store version of iTunes may not have the necessary components for this to work. If you have the Windows Store version of iTunes and the DroidCam client is not detecting any devices, try re-installing iTunes manually by following the “Windows” link, or see this help article by Apple.
Connect with internet browsers (Android)
To use the “IP Cam” feature you normally don’t need to install any extra software on the computer.
1. Turn on WiFi on your phone and connect to a WiFi network as you normally would.
2. The app will show Wifi network name, and IP & Port information. If the IP is all zeros (0.0.0.0) – you are not properly connected to a network.
3. Open your internet browser (Firefox, Chrome, etc), and enter http://ip:port into the address bar (replace these with the actual ip and port values from the app). This should open a web page with the camera feed embedded inside.
Tip: Use an MJPEG viewer app or program to access the raw feed via http://ip:port/video (eg. on a Tablet, another smartphone, or a media player such as VLC). You can also specify resolution in the URL, and use the word “force” if you’d like to override any existing connections: http://ip:port/video.force?1280×720.
This can be handy is you want to connect many devices to eg. OBS Studio. If you’d like to connect over USB using the http method, use this USB setup tool which will create local port mappings to all connected phones via adb and the special 127.0.0.1 IP address.
WiFi Hotspots, USB Tethering, USB-C Ethernet
Both USB Tethering and WiFi Hotspot connections with your phone can work with DroidCam. Some phones also work with USB-C to Ethernet wired connections.On Android, you’ll need to find the IP address of the phone and enter that into the WiFi tab of the DroidCam client.
The easiest way is to open the phones Settings, scroll down to “System” or “About”, and look for the ‘Network’ section.
On iOS, for USB Tethering you can use standard USB connection option in the DroidCam client (see above).
For WiFi hotspots, try these standard IPs 172.20.10.1, 10.0.0.1, 192.168.0.1. Alternatively, on your PC open the Start menu and launch the Command Prompt program. Enter ipconfig command, and look for ‘router’ or ‘gateway’ address, and use that as the phone IP.
WiFi Server Mode (DroidCamX only)
Instead of connecting to the phone app from the PC client, DroidCamX can connect to PC client(s) from the phone.1. Use the “WiFi Server” option on the PC client. Click [Start] to wait for a connection.
Drivers Phd Port Devices 2019
3. Open DroidCamX on your phone, use the options menu (⋮) and choose “Connect to Server”. You will need the computers local IP address (usually 192.168…) – look in your network settings or open a Command Prompt and type in ipconfig.

How To Connect Two Programs (TheSkyX And PHD2) To ASCOM ...
Back to Home Page | How to switch to 720p
